wp:paragraph
Making a lava lamp at home is one of the easiest and most exciting kitchen science experiments you can try. With a clear bottle, cooking oil, water, food coloring, and a fizzy tablet, you can create colorful bubbles that rise and fall like a real lava lamp. The best part is that this experiment does not require expensive lab equipment. It uses simple household materials and teaches real science in a visual way.
/wp:paragraph
wp:paragraph
A homemade lava lamp works because oil and water do not mix, oil is less dense than water, and carbon dioxide gas bubbles can carry colored water upward through the oil. When the gas escapes at the top, the colored water falls back down. Scientific American explains that when an effervescent tablet reaches the water layer, it releases carbon dioxide bubbles that attach to water droplets and carry them upward.
/wp:paragraph
wp:paragraph
This experiment is perfect for children, students, parents, and teachers because it turns basic chemistry and physics into something easy to see. Instead of only reading about density, immiscible liquids, and gas formation, you can watch these ideas happen inside a bottle.
/wp:paragraph
wp:paragraph
For more simple science activities, visit our DIY Experiments category. You can also read our related article on Bananas Are Radioactive if you enjoy surprising science facts from everyday life.
/wp:paragraph
wp:heading
Accuracy note
/wp:heading
wp:paragraph
This article explains a simple kitchen science experiment for educational purposes. Adult supervision is recommended, especially when children handle glass containers, food coloring, vinegar, baking soda, or fizzy tablets. Do not drink the mixture, do not heat the bottle, and do not seal the bottle tightly while it is fizzing.
/wp:paragraph
wp:heading
Key Facts About the Homemade Lava Lamp Experiment
/wp:heading
wp:paragraph
A homemade lava lamp uses oil, water, color, and gas bubbles to create a rising-and-falling blob effect.
/wp:paragraph
wp:paragraph
Oil and water are immiscible, meaning they do not mix well. The Exploratorium explains that oil and water are immiscible liquids, which is why they separate into layers.
/wp:paragraph
wp:paragraph
Oil floats above water because it is less dense than water. National Geographic Kids explains this same density idea in its lava lamp activity, where oil rises and heavier materials sink.
/wp:paragraph
wp:paragraph
Effervescent tablets create carbon dioxide gas when they react in the water layer. Scientific American explains that these gas bubbles rise and carry some colored water upward, creating the lava lamp effect.
/wp:paragraph
wp:paragraph
The American Chemical Society’s lava lamp activity uses oil, water, food coloring, and part of an Alka-Seltzer tablet to demonstrate the same bubbling science.
/wp:paragraph
wp:heading
What You Need to Make a Lava Lamp at Home
/wp:heading
wp:paragraph
You only need a few simple supplies.
/wp:paragraph
wp:paragraph
Materials:
/wp:paragraph
wp:paragraph
Clear plastic bottle or tall clear glass jar
/wp:paragraph
wp:paragraph
Vegetable oil or cooking oil
/wp:paragraph
wp:paragraph
Water
/wp:paragraph
wp:paragraph
Food coloring
/wp:paragraph
wp:paragraph
Fizzy tablet, such as an effervescent antacid tablet
/wp:paragraph
wp:paragraph
Small spoon or funnel
/wp:paragraph
wp:paragraph
Tray or newspaper to catch spills
/wp:paragraph
wp:paragraph
Optional: flashlight or phone light to shine behind the bottle
/wp:paragraph
wp:paragraph
Best bottle choice: use a clear plastic bottle if children are doing the experiment. A glass jar looks nice, but plastic is safer for younger kids.
/wp:paragraph
wp:paragraph
Best oil choice: vegetable oil, canola oil, sunflower oil, or baby oil can work. Cooking oil is usually easiest because it is already available in most kitchens.
/wp:paragraph
wp:paragraph
Best color choice: bright food coloring works best. Blue, red, green, and purple usually create a strong lava lamp look.
/wp:paragraph
wp:heading
Safety Notes Before You Start
/wp:heading
wp:paragraph
This is a safe home science experiment when done properly, but a few precautions are important.
/wp:paragraph
wp:paragraph
Do not drink the mixture.
/wp:paragraph
wp:paragraph
Do not use flames or heat.
/wp:paragraph
wp:paragraph
Do not seal the bottle tightly while it is fizzing.
/wp:paragraph
wp:paragraph
Do not shake the bottle hard.
/wp:paragraph
wp:paragraph
Keep food coloring away from clothes and carpets.
/wp:paragraph
wp:paragraph
Use adult supervision for young children.
/wp:paragraph
wp:paragraph
Wash hands after the experiment.
/wp:paragraph
wp:paragraph
The most important safety rule is this: never close the bottle tightly during the fizzing reaction. Gas needs space to escape. If the bottle is sealed while gas is forming, pressure can build up.
/wp:paragraph
wp:paragraph
Example: if you add a fizzy tablet and immediately tighten the cap, carbon dioxide gas continues forming inside the bottle. That pressure has nowhere to go, which can cause leaking, popping, or a messy spill. Keep the bottle open while the reaction happens.
/wp:paragraph
wp:heading
Step-by-Step Method: How to Make a Lava Lamp at Home
/wp:heading
wp:paragraph
Follow these steps carefully.
/wp:paragraph
wp:heading {“level”:3}
Step 1: Add Water
/wp:heading
wp:paragraph
Pour water into the clear bottle until it is about one-quarter full.
/wp:paragraph
wp:paragraph
You do not need to fill the bottle with water. The water layer should stay at the bottom because oil will float above it.
/wp:paragraph
wp:paragraph
Example: if you are using a 500 ml bottle, add about 100 to 125 ml of water.
/wp:paragraph
wp:heading {“level”:3}
Step 2: Add Food Coloring
/wp:heading
wp:paragraph
Add 6 to 10 drops of food coloring to the water.
/wp:paragraph
wp:paragraph
The color will sink through the oil later and mix with the water layer. If you want a stronger color, add a few more drops.
/wp:paragraph
wp:paragraph
Tip: darker colors are easier to see through the oil.
/wp:paragraph
wp:heading {“level”:3}
Step 3: Add Oil
/wp:heading
wp:paragraph
Slowly pour vegetable oil into the bottle until it is nearly full, leaving some empty space at the top.
/wp:paragraph
wp:paragraph
The oil will float above the colored water. Wait for the layers to separate before adding the fizzy tablet.
/wp:paragraph
wp:paragraph
Example: after a minute, you should see colored water at the bottom and a thick oil layer above it.
/wp:paragraph
wp:heading {“level”:3}
Step 4: Add the Fizzy Tablet
/wp:heading
wp:paragraph
Break one fizzy tablet into small pieces. Drop one small piece into the bottle.
/wp:paragraph
wp:paragraph
The tablet will sink through the oil and reach the water. Once it touches the water, it will start fizzing and releasing carbon dioxide bubbles.
/wp:paragraph
wp:heading {“level”:3}
Step 5: Watch the Lava Lamp Effect
/wp:heading
wp:paragraph
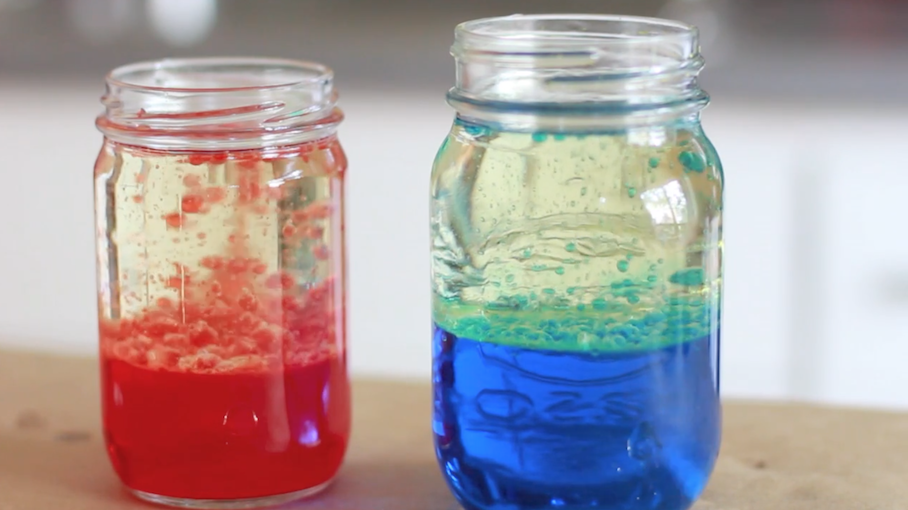
Colored bubbles will rise through the oil. When the bubbles reach the top, the gas escapes, and the colored water drops back down.
/wp:paragraph
wp:paragraph
This creates the moving lava lamp effect.
/wp:paragraph
wp:heading {“level”:3}
Step 6: Repeat the Reaction
/wp:heading
wp:paragraph
When the fizzing slows down, add another small piece of the tablet.
/wp:paragraph
wp:paragraph
Do not add too much at once. Small pieces create a cleaner effect and reduce mess.
/wp:paragraph
wp:heading
What Happens Inside the Bottle?
/wp:heading
wp:paragraph
The homemade lava lamp works because of three main science ideas: density, immiscibility, and gas formation.
/wp:paragraph
wp:paragraph
Density means how much mass is packed into a certain amount of space. Water is denser than oil, so water stays at the bottom and oil floats above it.
/wp:paragraph
wp:paragraph
Immiscibility means two liquids do not mix. Oil and water do not mix because their molecules behave differently. Water molecules are strongly attracted to each other, while oil molecules do not mix well with water.
/wp:paragraph
wp:paragraph
Gas formation happens when the fizzy tablet reacts with water. The reaction releases carbon dioxide gas. These gas bubbles rise because gas is less dense than the surrounding liquid.
/wp:paragraph
wp:paragraph
Example: when the gas bubbles form in the colored water, they lift tiny blobs of water upward. When the bubbles pop at the surface, the water loses its gas lift and falls back down.
/wp:paragraph
wp:paragraph
That rise-and-fall motion is what makes the bottle look like a lava lamp.
/wp:paragraph
wp:heading
Why Oil and Water Do Not Mix
/wp:heading
wp:paragraph
Oil and water do not mix because of their molecular properties. Water is polar, while oil is nonpolar. In simple words, water molecules prefer to stay with other water molecules, and oil molecules prefer to stay with other oil molecules.
/wp:paragraph
wp:paragraph
That is why the bottle forms two layers instead of one mixed liquid.
/wp:paragraph
wp:paragraph
Example: if you pour oil into a cup of water and stir it, the liquids may look mixed for a short time. But after a while, they separate again. The oil floats upward and the water settles below.
/wp:paragraph
wp:paragraph
This is the same reason salad dressing separates when it sits for a while. Oil and vinegar or water-based liquids do not stay mixed unless something helps them form an emulsion.
/wp:paragraph
wp:heading
Why the Food Coloring Goes Into the Water
/wp:heading
wp:paragraph
Food coloring is water-based, so it mixes with water rather than oil. When you drop food coloring into the bottle, it may pass through the oil as small droplets before reaching the water layer.
/wp:paragraph
wp:paragraph
Example: if you add blue food coloring, it may look like blue beads falling through the oil. Once those beads reach the water, they spread out and color the water.
/wp:paragraph
wp:paragraph
This is a useful mini-lesson by itself. It shows that not everything mixes with oil. Food coloring prefers water because it is water-soluble.
/wp:paragraph
wp:heading
Why the Fizzy Tablet Makes Bubbles
/wp:heading
wp:paragraph
The fizzy tablet creates bubbles because it reacts with water. Many effervescent tablets contain an acid and a base that react when dissolved. This reaction produces carbon dioxide gas.
/wp:paragraph
wp:paragraph
The gas forms bubbles in the colored water. Those bubbles attach to droplets of colored water and carry them upward through the oil.
/wp:paragraph
wp:paragraph
Scientific American explains that the tablet sinks through the oil without reacting, but once it touches the water, the reaction releases carbon dioxide gas bubbles.
/wp:paragraph
wp:paragraph
Example: this is similar to the fizz you see when a carbonated drink releases bubbles. The bubbles rise because gas is lighter than liquid.
/wp:paragraph
wp:heading
Kitchen-Only Version Without a Fizzy Tablet
/wp:heading
wp:paragraph
If you do not have an effervescent tablet, you can still make a lava-lamp-style reaction using baking soda and vinegar.
/wp:paragraph
wp:paragraph
Materials:
/wp:paragraph
wp:paragraph
Clear bottle or jar
/wp:paragraph
wp:paragraph
Vegetable oil
/wp:paragraph
wp:paragraph
Vinegar
/wp:paragraph
wp:paragraph
Food coloring
/wp:paragraph
wp:paragraph
Baking soda
/wp:paragraph
wp:paragraph
Spoon
/wp:paragraph
wp:paragraph
Method:
/wp:paragraph
wp:paragraph
Add 2 tablespoons of baking soda to the empty bottle.
/wp:paragraph
wp:paragraph
In a separate cup, mix vinegar with food coloring.
/wp:paragraph
wp:paragraph
Pour oil into the bottle until it is mostly full.
/wp:paragraph
wp:paragraph
Slowly add the colored vinegar.
/wp:paragraph
wp:paragraph
Watch the bubbles rise through the oil.
/wp:paragraph
wp:paragraph
This version works because baking soda and vinegar react to produce carbon dioxide gas. The effect may look different from the tablet version, but it still creates rising bubbles.
/wp:paragraph
wp:paragraph
Important: keep the bottle open during the reaction.
/wp:paragraph
wp:heading
Salt Version: A Simple Alternative
/wp:heading
wp:paragraph
Another version uses salt instead of a fizzy tablet. The Exploratorium describes a “salt volcano” activity where salt sinks through oil, carries blobs of oil downward, dissolves in water, and releases the oil so it rises again.
/wp:paragraph
wp:paragraph
Materials:
/wp:paragraph
wp:paragraph
Clear jar
/wp:paragraph
wp:paragraph
Water
/wp:paragraph
wp:paragraph
Oil
/wp:paragraph
wp:paragraph
Food coloring
/wp:paragraph
wp:paragraph
Salt
/wp:paragraph
wp:paragraph
Method:
/wp:paragraph
wp:paragraph
Fill the jar about halfway with water.
/wp:paragraph
wp:paragraph
Add food coloring.
/wp:paragraph
wp:paragraph
Pour oil on top.
/wp:paragraph
wp:paragraph
Sprinkle salt over the oil.
/wp:paragraph
wp:paragraph
Watch the oil blobs move.
/wp:paragraph
wp:paragraph
This version does not create the same fizzy bubble effect, but it is a good way to show density. Salt is heavier than water and oil, so it sinks. Some oil sticks to the salt grains and gets pulled down. When the salt dissolves, the oil floats back up.
/wp:paragraph
wp:paragraph
Example: the salt acts like a temporary weight that drags oil downward. Once the salt dissolves, the oil escapes and rises.
/wp:paragraph
wp:heading
Best Experiment Variables to Test
/wp:heading
wp:paragraph
You can turn this simple lava lamp into a real science investigation by changing one variable at a time.
/wp:paragraph
wp:paragraph
Try these tests:
/wp:paragraph
wp:paragraph
Use warm water vs cold water.
/wp:paragraph
wp:paragraph
Use different oils.
/wp:paragraph
wp:paragraph
Use more or less food coloring.
/wp:paragraph
wp:paragraph
Use a whole tablet vs a small tablet piece.
/wp:paragraph
wp:paragraph
Use a tall bottle vs a wide jar.
/wp:paragraph
wp:paragraph
Use salt instead of a fizzy tablet.
/wp:paragraph
wp:paragraph
Use baking soda and vinegar instead of a tablet.
/wp:paragraph
wp:paragraph
Example: if you use warm water, the reaction may happen faster. If you use cold water, the fizzing may be slower. This can help students understand how temperature affects chemical reactions.
/wp:paragraph
wp:paragraph
Make sure to change only one thing at a time. If you change oil type, water temperature, and tablet size all at once, it becomes harder to know what caused the difference.
/wp:paragraph
wp:heading
Simple Observation Table for Students
/wp:heading
wp:paragraph
You can add this table to a classroom worksheet or home science notebook.
/wp:paragraph
wp:table
| Test | What You Changed | What Happened? | Why Do You Think It Happened? |
|---|---|---|---|
| Test 1 | Small tablet piece | Bubbles rose slowly | Less gas formed at one time |
| Test 2 | Bigger tablet piece | More bubbles appeared | More gas formed quickly |
| Test 3 | Cold water | Reaction slowed down | Temperature may affect reaction speed |
| Test 4 | Warm water | Reaction became faster | Warmer water can speed up dissolving |
| Test 5 | Salt instead of tablet | Oil moved differently | Salt pulled oil downward, then dissolved |
/wp:table
wp:paragraph
This makes the activity more educational and less like a simple craft.
/wp:paragraph
wp:heading
What Children Learn From This Experiment
/wp:heading
wp:paragraph
This experiment teaches several important science ideas.
/wp:paragraph
wp:paragraph
Children learn that liquids can have different densities.
/wp:paragraph
wp:paragraph
They learn that some liquids do not mix.
/wp:paragraph
wp:paragraph
They observe gas formation.
/wp:paragraph
wp:paragraph
They see how bubbles can lift liquid droplets.
/wp:paragraph
wp:paragraph
They learn that science can happen with everyday materials.
/wp:paragraph
wp:paragraph
They practice observation and prediction.
/wp:paragraph
wp:paragraph
They learn basic experimental thinking.
/wp:paragraph
wp:paragraph
Example: before adding the fizzy tablet, ask: “What do you think will happen when the tablet reaches the water?” This helps students make a prediction. After the reaction, ask: “Why did the colored bubbles rise and fall?” This builds explanation skills.
/wp:paragraph
wp:heading
Troubleshooting: Why Your Lava Lamp Did Not Work
/wp:heading
wp:paragraph
Sometimes the lava lamp does not work perfectly on the first try. Here are common problems and fixes.
/wp:paragraph
wp:paragraph
If nothing happens, the fizzy tablet may be old or weak. Try a fresh tablet.
/wp:paragraph
wp:paragraph
If the color is hard to see, add more food coloring.
/wp:paragraph
wp:paragraph
If the bottle looks cloudy, you may have shaken it too much. Let it sit until the layers separate again.
/wp:paragraph
wp:paragraph
If the reaction is too fast, use a smaller piece of tablet.
/wp:paragraph
wp:paragraph
If the bubbles are too small, try a different bottle shape or add a slightly larger tablet piece.
/wp:paragraph
wp:paragraph
If oil and water look mixed, wait a few minutes. They should separate naturally.
/wp:paragraph
wp:paragraph
Example: a tall narrow bottle usually gives a better lava lamp effect than a wide bowl because the bubbles have more vertical space to rise and fall.
/wp:paragraph
wp:heading
Common Mistakes to Avoid
/wp:heading
wp:paragraph
Do not fill the bottle all the way to the top.
/wp:paragraph
wp:paragraph
Do not seal the cap tightly while fizzing.
/wp:paragraph
wp:paragraph
Do not use heat or candles.
/wp:paragraph
wp:paragraph
Do not use unsafe chemicals.
/wp:paragraph
wp:paragraph
Do not let children drink the mixture.
/wp:paragraph
wp:paragraph
Do not shake the bottle violently.
/wp:paragraph
wp:paragraph
Do not use glass with very young children.
/wp:paragraph
wp:paragraph
Do not pour large amounts of oil down the sink.
/wp:paragraph
wp:paragraph
The oil disposal point is important. After the experiment, pour the liquid into a container and dispose of it according to local household waste guidance. Avoid pouring a lot of oil into the drain because oil can contribute to clogged pipes.
/wp:paragraph
wp:heading
How to Make It Look Better for Photos
/wp:heading
wp:paragraph
If you are making this for a school project, blog image, or classroom activity, you can improve the visual effect.
/wp:paragraph
wp:paragraph
Use a clear bottle with no label.
/wp:paragraph
wp:paragraph
Use bright food coloring.
/wp:paragraph
wp:paragraph
Place the bottle in front of a dark background.
/wp:paragraph
wp:paragraph
Shine a flashlight from behind or below.
/wp:paragraph
wp:paragraph
Use a tall narrow container.
/wp:paragraph
wp:paragraph
Add tablet pieces slowly.
/wp:paragraph
wp:paragraph
Wipe the outside of the bottle before taking photos.
/wp:paragraph
wp:paragraph
Example: a blue lava lamp against a black background with a small flashlight behind it can look more dramatic and easier to photograph.
/wp:paragraph
wp:paragraph
For more visual science content, explore our Mind-Blowing Facts category.
/wp:paragraph
wp:heading
The Science Vocabulary Behind the Lava Lamp
/wp:heading
wp:paragraph
Here are the most important terms:
/wp:paragraph
wp:paragraph
Density: how much mass is packed into a certain volume.
/wp:paragraph
wp:paragraph
Immiscible: liquids that do not mix well.
/wp:paragraph
wp:paragraph
Carbon dioxide: a gas produced by the fizzy reaction.
/wp:paragraph
wp:paragraph
Effervescent: something that releases bubbles in liquid.
/wp:paragraph
wp:paragraph
Soluble: able to dissolve in a liquid.
/wp:paragraph
wp:paragraph
Polarity: a property that helps explain why some substances mix and others do not.
/wp:paragraph
wp:paragraph
Reaction: a process where substances change and form new substances.
/wp:paragraph
wp:paragraph
Example: when the fizzy tablet touches water, it reacts and produces carbon dioxide gas. That gas is what creates the bubbling motion.
/wp:paragraph
wp:heading
Real Lava Lamp vs Homemade Lava Lamp
/wp:heading
wp:paragraph
A real commercial lava lamp is different from this kitchen experiment. Real lava lamps usually use wax, a special liquid, and heat from a bulb. The wax rises and falls because heating changes its density.
/wp:paragraph
wp:paragraph
A homemade lava lamp uses oil, water, food coloring, and gas bubbles. It is temporary and does not need heat.
/wp:paragraph
wp:table
| Feature | Homemade Lava Lamp | Real Lava Lamp |
|---|---|---|
| Main materials | Oil, water, food coloring, fizzy tablet | Wax, liquid, lamp bulb |
| Energy source | Chemical fizzing | Heat |
| Best use | Science experiment | Decoration |
| Safety | No heat needed | Gets warm during use |
| Duration | Temporary | Long-lasting |
| Main science | Density, immiscibility, gas bubbles | Density changes due to heat |
/wp:table
wp:paragraph
Example: in a real lava lamp, wax rises when it becomes warmer and less dense. In the homemade version, colored water rises because gas bubbles carry it upward.
/wp:paragraph
wp:heading
Why This Experiment Is Good for Learning
/wp:heading
wp:paragraph
This experiment is effective because it is simple, visual, and memorable. Students can see the science instead of only reading definitions. The movement of colored bubbles makes abstract ideas easier to understand.
/wp:paragraph
wp:paragraph
It also helps students learn that science is not limited to laboratories. Science happens in kitchens, gardens, classrooms, and everyday life.
/wp:paragraph
wp:paragraph
Example: oil floating on water is the same density principle that helps explain oil spills on oceans. Bubbles rising through liquid are also connected to carbonated drinks, boiling water, and gas release in chemical reactions.
/wp:paragraph
wp:paragraph
This makes the homemade lava lamp more than a fun activity. It becomes a doorway into chemistry and physics.
/wp:paragraph
wp:heading
Frequently Asked Questions
/wp:heading
wp:heading {“level”:3}
Can I make a lava lamp at home without Alka-Seltzer?
/wp:heading
wp:paragraph
Yes. You can use baking soda and vinegar as an alternative. Add baking soda to the bottle first, then add oil, and slowly pour in colored vinegar. The baking soda and vinegar reaction creates carbon dioxide bubbles.
/wp:paragraph
wp:heading {“level”:3}
Why does oil float on water?
/wp:heading
wp:paragraph
Oil floats because it is less dense than water. Since oil and water do not mix, the oil stays as a separate layer above the water.
/wp:paragraph
wp:heading {“level”:3}
Why does the food coloring mix with water but not oil?
/wp:heading
wp:paragraph
Most food coloring is water-based. It dissolves in water but does not mix well with oil.
/wp:paragraph
wp:heading {“level”:3}
Why do the colored bubbles rise?
/wp:heading
wp:paragraph
The fizzy tablet creates carbon dioxide gas in the water. The gas bubbles attach to colored water droplets and carry them upward through the oil.
/wp:paragraph
wp:heading {“level”:3}
Why do the blobs fall back down?
/wp:heading
wp:paragraph
When the gas escapes at the top, the colored water loses its lift. Since water is denser than oil, it falls back down.
/wp:paragraph
wp:heading {“level”:3}
Is this experiment safe for kids?
/wp:heading
wp:paragraph
Yes, with adult supervision. Use a plastic bottle for younger children, do not let anyone drink the mixture, and do not seal the bottle tightly while it is fizzing.
/wp:paragraph
wp:heading {“level”:3}
Can I reuse the lava lamp?
/wp:heading
wp:paragraph
Yes, you can reuse it for a short time. When the bubbles stop, add another small piece of fizzy tablet. Eventually, the mixture may become cloudy and should be discarded.
/wp:paragraph
wp:heading {“level”:3}
Can I use olive oil?
/wp:heading
wp:paragraph
Yes, but lighter oils such as vegetable oil or canola oil usually look clearer. Olive oil may add a yellow tint.
/wp:paragraph
wp:heading {“level”:3}
Can I put a cap on the bottle?
/wp:heading
wp:paragraph
Only after the fizzing completely stops. Never seal the bottle tightly during the reaction because gas pressure can build up.
/wp:paragraph
wp:heading {“level”:3}
Can I use glitter?
/wp:heading
wp:paragraph
You can add a small amount of glitter for visual effect, but avoid using too much. Glitter can make cleanup harder and is not necessary for the science.
/wp:paragraph
wp:heading
Conclusion
/wp:heading
wp:paragraph
Making a lava lamp at home using kitchen supplies is a simple, colorful, and educational science experiment. With oil, water, food coloring, and a fizzy tablet, you can create rising and falling blobs that look like a real lava lamp while learning important science concepts.
/wp:paragraph
wp:paragraph
The experiment works because oil and water do not mix, oil floats above water, and carbon dioxide bubbles carry colored water upward. When the bubbles pop, the colored water falls back down, creating the lava lamp effect.
/wp:paragraph
wp:paragraph
This activity is especially useful because it teaches density, immiscibility, gas formation, solubility, and observation skills in a way that is easy to understand. It is safe, low-cost, and perfect for home learning, classroom demonstrations, science fairs, or weekend family activities.
/wp:paragraph
wp:paragraph
For readers, the simplest explanation is this: a homemade lava lamp is a beautiful science lesson inside a bottle. It shows that even ordinary kitchen supplies can reveal real chemistry and physics when you know what to look for.
/wp:paragraph
wp:heading
Sources and Further Reading
/wp:heading
wp:paragraph
Scientific American: Make Your Own Lava Lamp
/wp:paragraph
wp:paragraph
American Chemical Society: Lava Lamp Activity
/wp:paragraph
wp:paragraph
Exploratorium: Salt Volcano, Make a Mini Lava Lite
/wp:paragraph
wp:paragraph
National Geographic Kids: Make a Groovy Lava Lamp
/wp:paragraph
wp:paragraph
Science Buddies: Make an Alka-Seltzer Powered Lava Lamp
/wp:paragraph